When it comes to selling jewelry on Etsy, presentation is everything. Your customers not only expect beautiful, high-quality pieces but also a delightful unboxing experience. Effective packaging ensures your items arrive safely and leaves a lasting impression on your buyers. In this guide, we’ll explore how to package your jewelry using custom jewelry boxes and custom mailer boxes to elevate your brand and customer satisfaction.
Why Packaging Matters
Packaging is the first physical interaction your customer has with your product. It reflects your brand’s personality and professionalism, so it’s crucial to get it right. Thoughtful packaging can:
- Protect your jewelry during shipping.
- Enhance the unboxing experience, making it memorable.
- Strengthen your brand identity.
- Encourage repeat purchases and positive reviews.
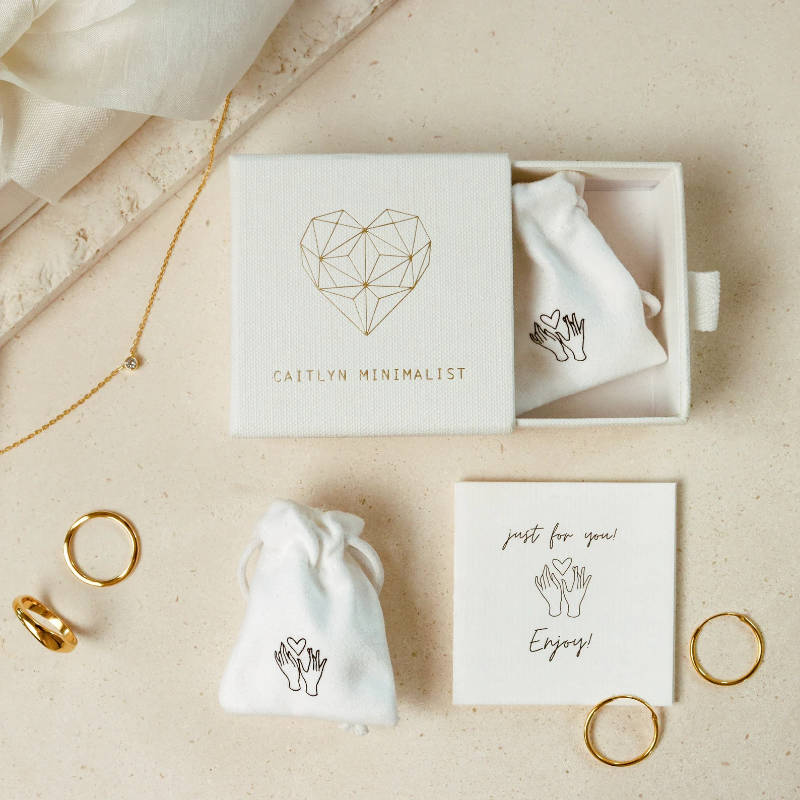
Step 1: Choose the Right Custom Jewelry Box
Understanding Your Options
When selecting a custom jewelry box, consider the following:
- Size and Shape: Your jewelry box should fit your items snugly without being too tight or too loose. Measure your jewelry pieces to ensure you choose the right dimensions.
- Material: Choose high-quality materials that reflect your brand’s ethos. Options include cardboard, wood, metal, or even eco-friendly materials like recycled paper.
- Design and Customization: Your box design should align with your brand aesthetics. This includes color, logo placement, and any additional decorative elements like ribbons or inserts.
Benefits of Custom Jewelry Boxes
Using custom jewelry boxes offers several advantages:
- Branding: Custom boxes with your logo and brand colors enhance brand recognition.
- Protection: Sturdy materials provide better protection for delicate jewelry pieces.
- Presentation: A beautifully designed box adds a premium feel to your product, delighting customers.
Step 2: Secure Your Jewelry Inside the Box
Once you have your custom jewelry boxes, the next step is to ensure your jewelry is securely placed inside. Here’s how:
Use Padding and Inserts
- Foam Inserts: These can be custom-cut to hold your jewelry pieces securely in place, preventing movement during transit.
- Tissue Paper: Wrapping your jewelry in tissue paper adds an extra layer of protection and a touch of elegance.
- Jewelry Pouches: Small pouches can be used for added protection and to keep items organized within the box.
Secure Fastenings
Ensure that any clasps or fastenings on your jewelry are secure to prevent them from getting tangled or damaged during shipping.
Step 3: Choose the Right Custom Mailer Box
Now that your jewelry is securely placed in its custom jewelry box, it’s time to think about the outer packaging. A custom mailer box offers additional protection and an opportunity to impress your customers right at their doorstep.
Selecting a Custom Mailer Box
Consider the following when choosing a custom mailer box:
- Size: The mailer box should be slightly larger than your jewelry box to allow room for padding but not too large to avoid excessive movement.
- Material: Corrugated cardboard is a popular choice for mailer boxes due to its durability and cost-effectiveness.
- Design: Like your jewelry boxes, your mailer boxes should reflect your brand. Consider custom printing with your logo, brand colors, and any other relevant information.
Step 4: Add Protective Padding
To ensure your jewelry box doesn’t shift around inside the mailer box, use protective padding such as:
- Bubble Wrap: Wrap your jewelry box in bubble wrap for cushioning.
- Packing Peanuts: Fill any empty spaces with packing peanuts to prevent movement.
- Eco-Friendly Alternatives: If you prefer sustainable options, consider biodegradable packing peanuts or shredded paper.
Step 5: Personalize the Unboxing Experience
The unboxing experience is your chance to make a lasting impression. Consider adding these personal touches:
- Thank You Notes: Include a handwritten thank-you note to show your appreciation. Personalization goes a long way in building customer loyalty.
- Business Cards: Include your business card to encourage repeat purchases and referrals.
- Care Instructions: Provide care instructions for the jewelry to help customers maintain their purchase.
Step 6: Seal and Label Your Package
Ensure your package is securely sealed and properly labeled to avoid any shipping issues:
- Seal with Strong Tape: Use high-quality tape to seal your mailer box securely.
- Label Correctly: Ensure your shipping label is clear and correctly placed. Consider using a thermal printer for a professional look.
Final Thoughts
Packaging your jewelry for Etsy doesn’t have to be complicated, but it does require attention to detail. By using custom jewelry boxes and custom mailer boxes, you can protect your items, enhance the customer experience, and strengthen your brand identity. Remember, the goal is to create an unboxing experience that delights your customers and keeps them coming back for more.
Leave a Reply